01 · Start here · about 3 minutes
Create your creator account
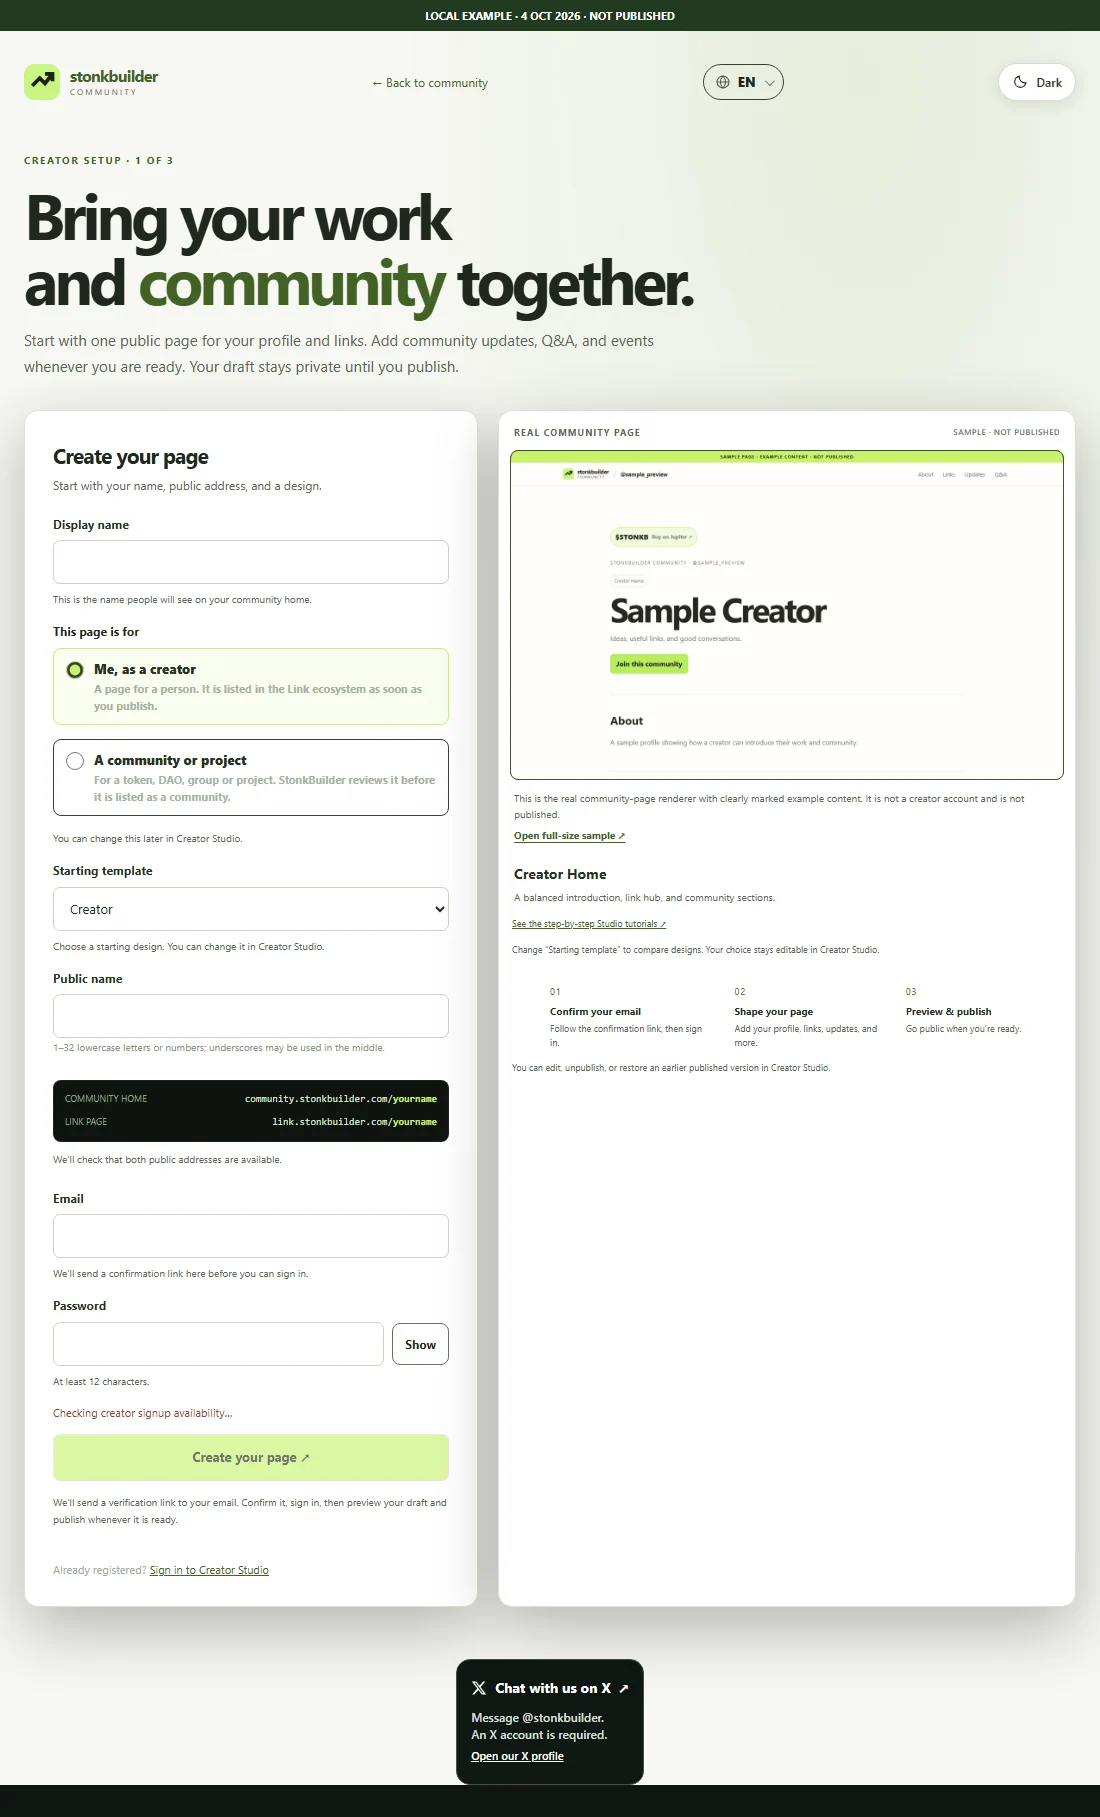
- Open Create your page. Choose a starting template; you can change it later.
- Enter your display name, public handle, email, and a password of at least 12 characters. Your handle forms both public addresses, so choose it carefully.
- Submit the form, then open the confirmation email sent to the address shown. If you mistyped the email, use Wrong address? Change it before starting again.
- Confirm your address using that email, then sign in. A creator account opens Studio; member accounts have a separate sign-in flow.
You should see: your community name and the editor in Creator Studio. Your page starts as a draft.
02 · Your introduction · about 2 minutes
Tell visitors who your page is for
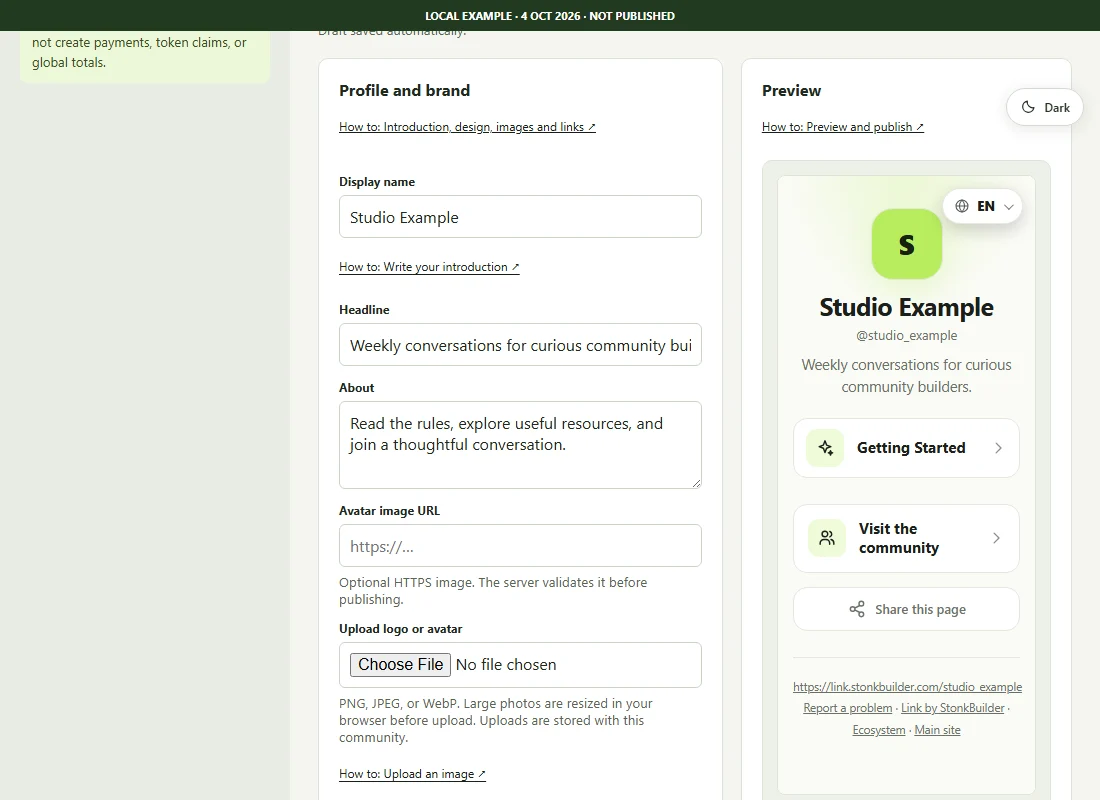
- Open Website → Profile and brand.
- Set a clear Display name, then write a one-line Headline. Example: “Weekly conversations for curious community builders.”
- Use About to explain what a newcomer can do. Keep both Headline and About within their 300-character limits.
- Choose Save draft. Saving keeps your edits in Studio; publishing comes later.
You should see: the introduction reflected in the preview. The first launch-checklist step updates from your actual draft.
03 · Layout and style · about 2 minutes
Choose a design and the sections you need
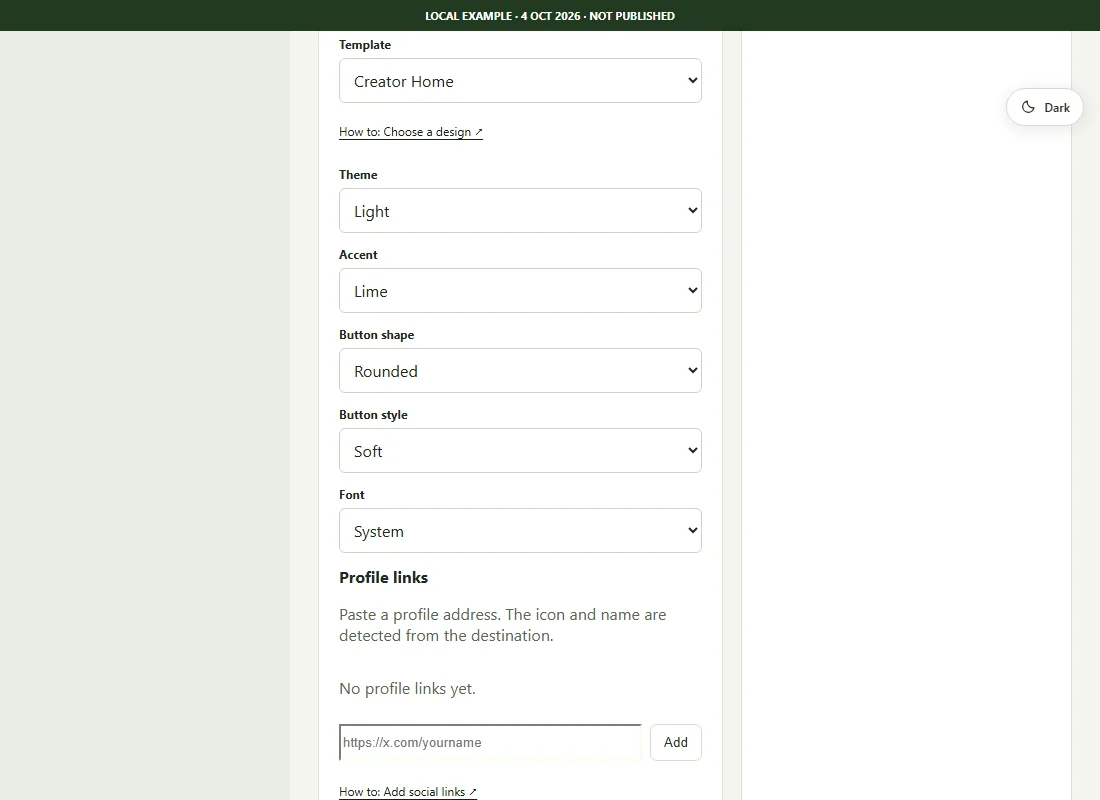
- In Profile and brand, choose Template: Creator Home, Educator, Project Ambassador, Analyst/Trader, Meme/Culture, or Minimal.
- Choose Theme, Accent, Button shape, Button style, and Font. Custom colour reveals a colour picker.
- Under Sections, enable the parts you can keep useful. Use the arrows to put them in the public order.
- Review the layout, then Save draft. On a phone, use Edit to change it and Preview to inspect it.
You should see: the selected design and enabled sections in the rendered preview.
04 · A useful next step · about 3 minutes
Add links people can trust and find
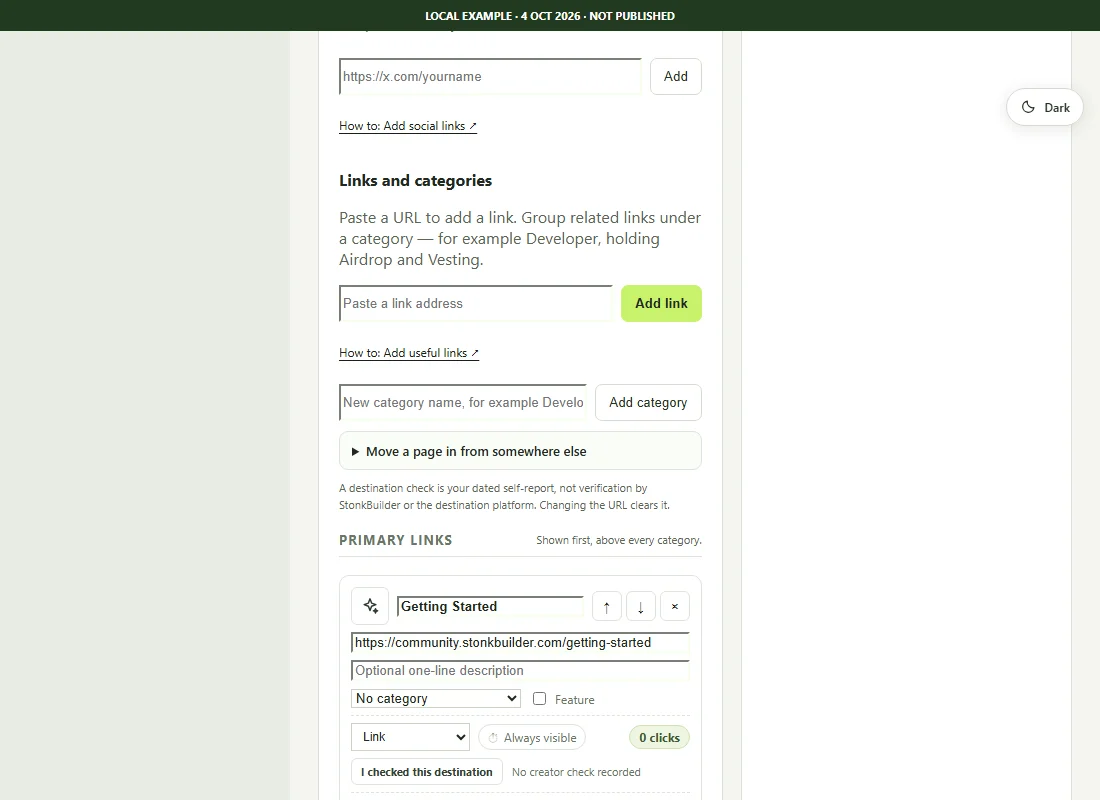
- Paste your destination into Paste a link address, then choose Add link. Give it a useful title such as “Read our community rules”.
- Add a category with New category name → Add category. Move related links into it and use the arrows to reorder them.
- Use Profile links for social profiles. Studio detects their names and icons from the addresses.
- Open each destination yourself. The link's Check link health action reports reachability; it is not a guarantee of safety or endorsement. Choose I checked this destination only after personally checking the destination, then save your draft. For a source link, select Curated source, fill Source / publication, optional author and your own note. Enter the independent evidence in the review reason, then choose Send for review. An operator reviews that exact destination; submitting does not mark it verified.
- For a timed link, expand its schedule, set Show from and/or Hide after in your device’s local time, then save and publish. Leave them blank for an always-visible link; the saved schedule uses UTC.
- To move links from another page, expand Move a page in from somewhere else, paste one address per line, and choose Add all. Studio uses what you paste; it does not import another account.
You should see: named links in the right categories. Save, preview and publish to make draft link changes public.
05 · Identity and social preview · about 2 minutes
Add your avatar and sharing image
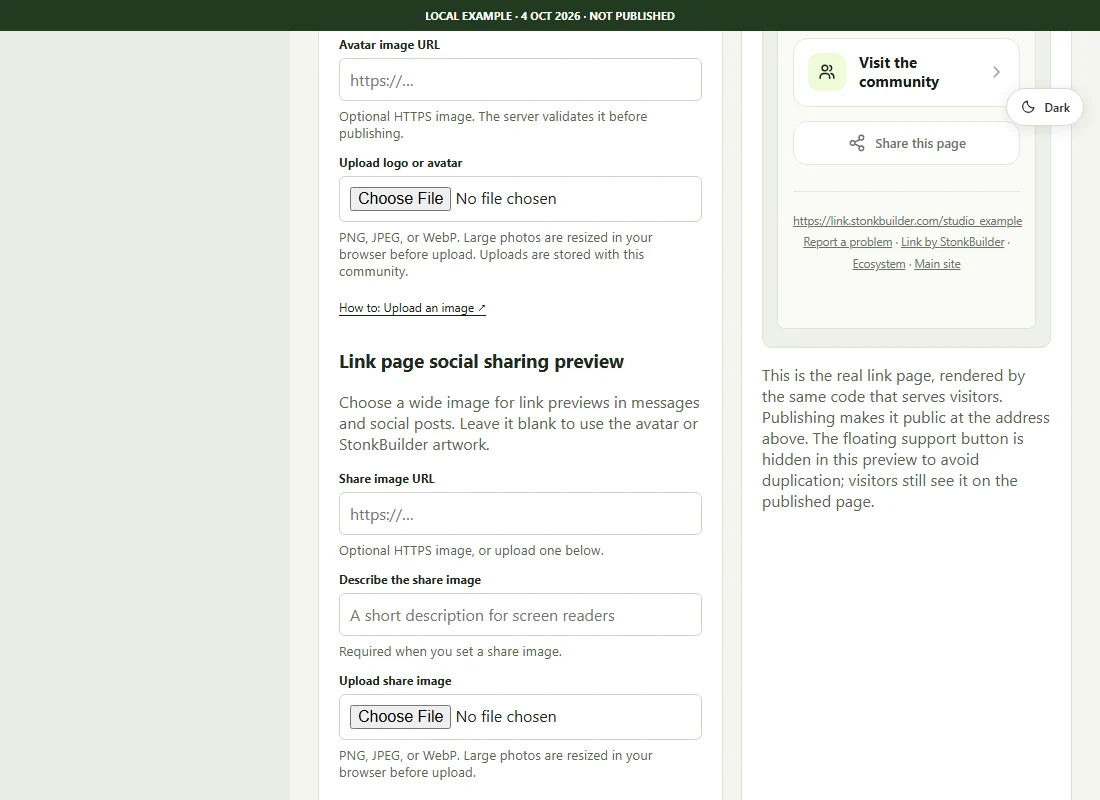
- Choose Upload logo or avatar for a PNG, JPEG or WebP image, or supply an HTTPS image URL. Large photos are resized in the browser before upload.
- Under Link page social sharing preview, upload a wide share image or provide its URL.
- Fill Describe the share image when you set a share image. This description is required and should explain the image to someone who cannot see it.
- Save and inspect the preview before publishing. Leave the share image blank to use the avatar or default artwork.
You should see: the uploaded image preview. A social network may cache an earlier image after you publish.
06 · Go live · about 3 minutes
Preview, publish, then check both addresses
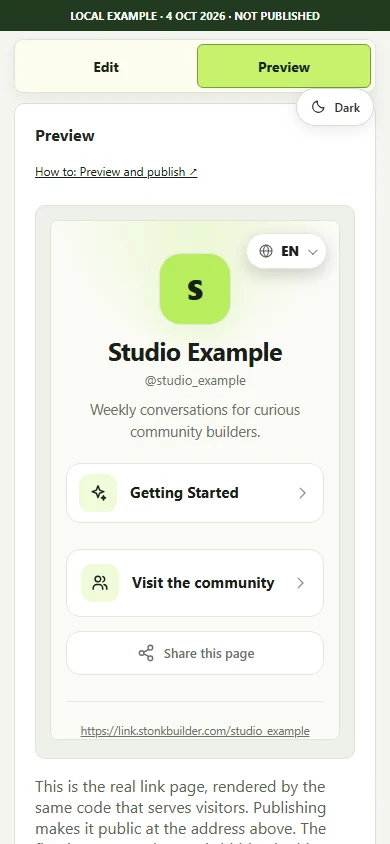
- Choose Save draft, then Review your page in the launch checklist. On a phone, the Preview switch brings the real rendered page into view.
- Check your introduction, design, section order, images and links. Preview shows the current draft; it does not mean the page is public.
- When ready, choose Publish changes. This saves the current draft and publishes that version.
- Wait for the publication success message. Use View Community home and View Link page to check both public pages in a separate tab. These links become available after publication.
- Check the public page on a phone and open every important link. Copy your published address to share it. Later draft edits require Publish changes again.
You should see: a publication confirmation and working public addresses for your handle. If publication fails, read the error; a saved draft is still a draft.
07 · Keep it current · about 2 minutes
Post a community update
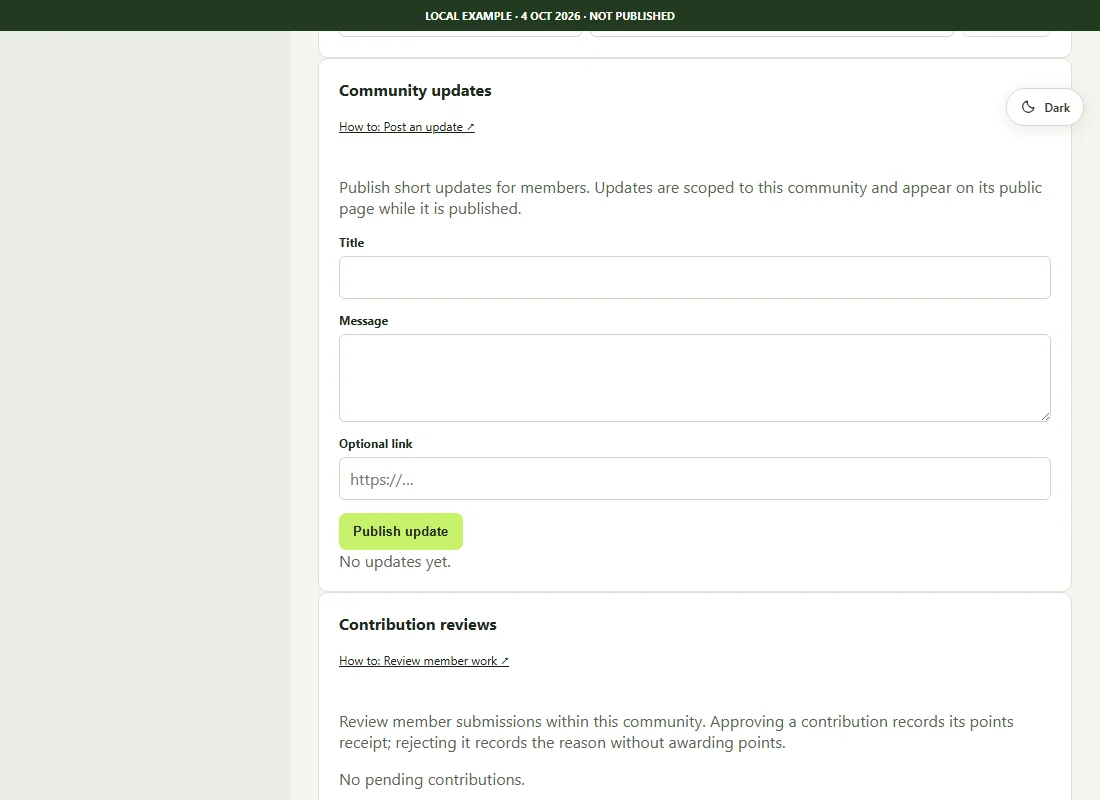
- Open Updates. Enter a Title and Message; add an optional link if it helps readers.
- Review the text before choosing Publish update. This action publishes an update separately from saving the profile draft.
- On a published community, check the public page with its Updates section enabled.
You should see: the new item in Studio's updates list. An unpublished community has no public page on which to show it.
08 · Host an event · about 3 minutes
Set an event time people can follow
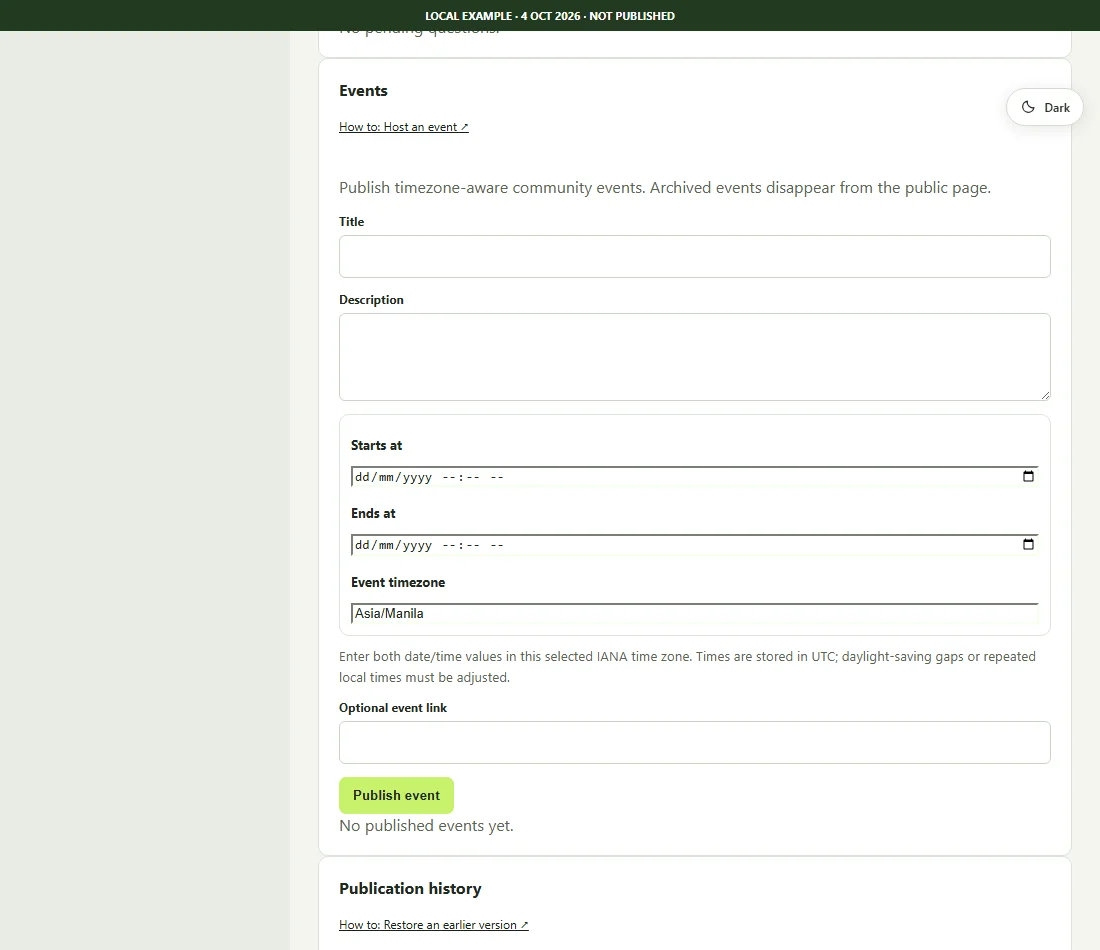
- Open Events. Add a title and description, then set start and end values in the selected Event timezone.
- Use an IANA zone such as Asia/Manila. Check the selected zone before publishing; it can differ from your device zone. The end must follow the start; adjust invalid or ambiguous daylight-saving times.
- Add an optional event link, review, and choose Publish event. For public visibility, publish the community and enable its Events section.
- Visitors can download Add to calendar (.ics) for a valid published event. This is a snapshot; later edits do not automatically update their calendar.
- If plans change, use the event's cancel or archive controls and check the public result. Cancelled events carry the cancellation note; archived events disappear from the public page.
You should see: the saved event and its zone-aware schedule. The current flow does not promise RSVP counts or reminder delivery.
09 · Members and review · about 3 minutes
Review contributions, questions and reports
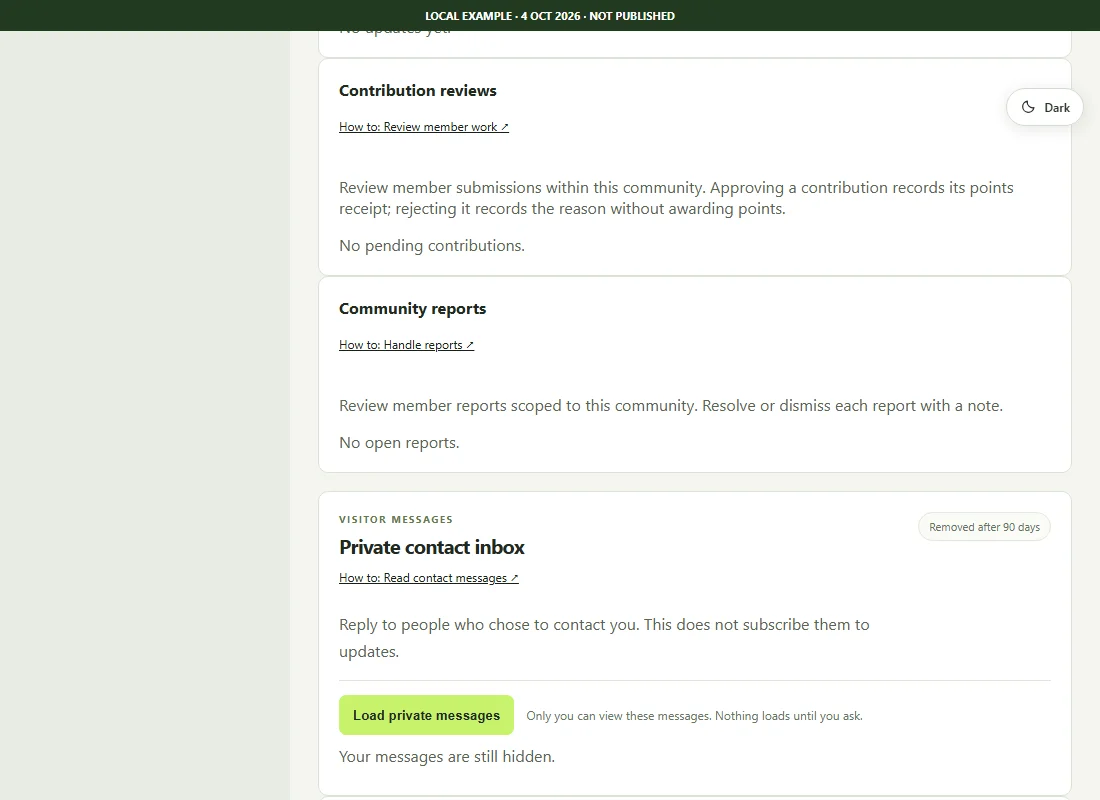
- Open Contribution reviews to inspect pending member work. Record your review and its reason; approval can record community points, rejection does not.
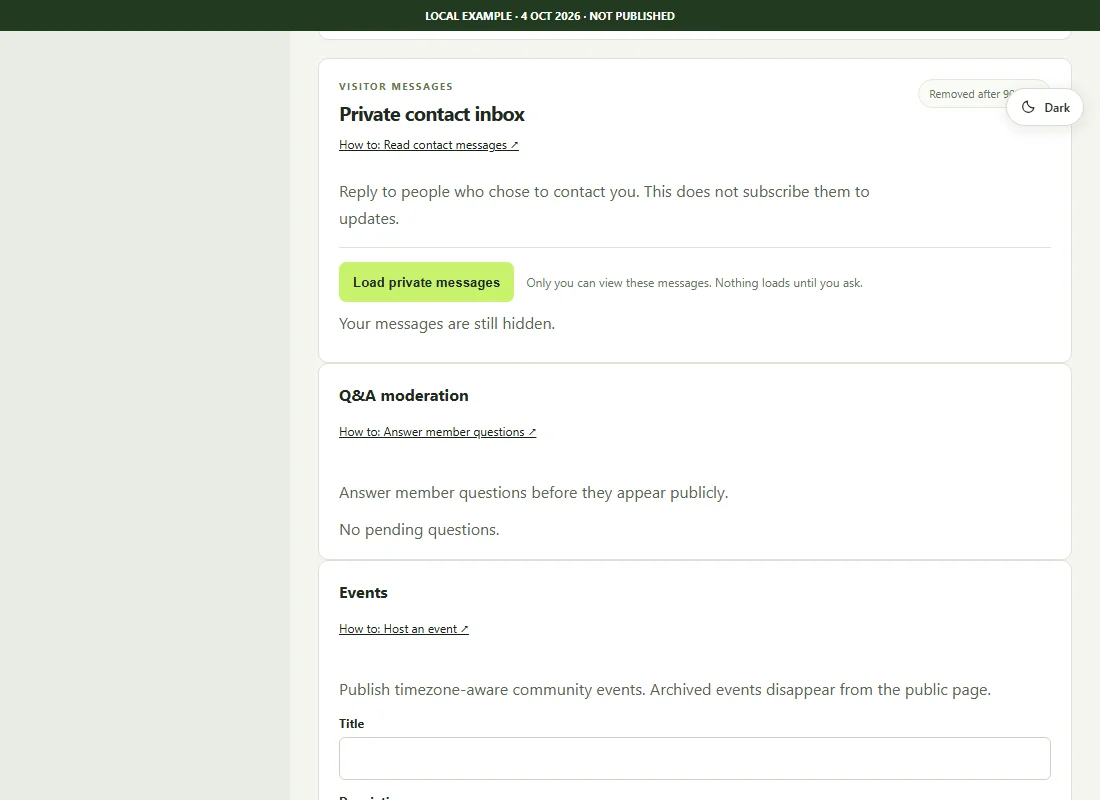
- Open Q&A to answer and moderate member questions before they appear publicly.
- Open Reports to review and resolve or dismiss a report with a note.
You should see: each decision in its community-scoped queue. Points are non-redeemable community records, not cash or tokens. Empty queues mean there is nothing waiting for review.
10 · Private messages · about 2 minutes
Read contact messages and subscribers deliberately
- Enable Private contact form in Sections and publish the profile to let visitors contact you from your public page.
- Open Contact inbox and choose Load private messages only when you want to read them. These messages are owner-only and removed after 90 days.
- Follow the message's reply action to continue with the visitor. A contact inquiry does not subscribe the sender to updates.
- Under Subscribers, choose Load confirmed subscriber emails to reveal confirmed addresses. Use Hide subscriber addresses when finished. Pending counts do not reveal addresses.
You should see: private information only after asking to load it. Subscriber collection does not mean Studio sends newsletters.
11 · Understand activity · about 2 minutes
Read analytics without guessing what they mean
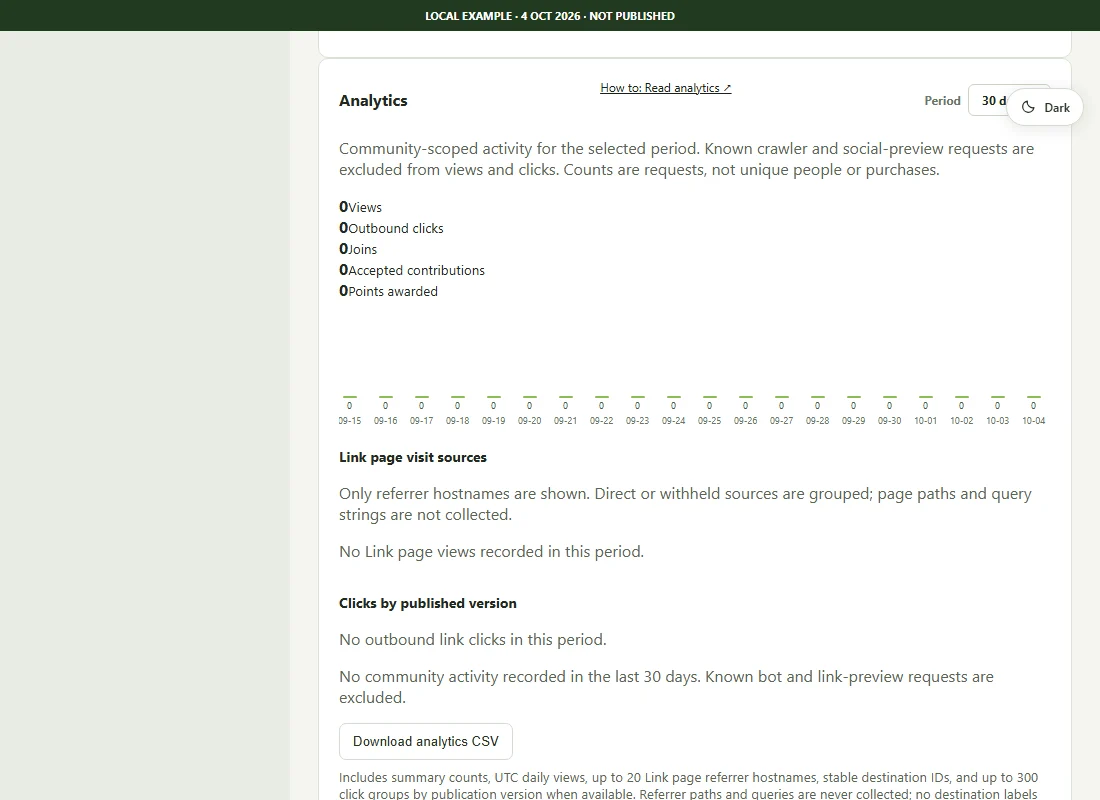
- Open Analytics and choose 7, 30 or 90 days.
- Read views, outbound clicks, joins, accepted contributions and points awarded. Counts are requests, not unique people, purchases or guaranteed conversions.
- Inspect daily views and click groups by published version when available. A new or quiet page may show zeros.
- Use Download analytics CSV when available. Exported referrer information uses hostnames, without paths or query strings.
- To manage discovery, open Ecosystem and choose how the page is listed. Published creator pages can be listed immediately; community listings need StonkBuilder review.
You should see: activity scoped to your community and selected period, with an explicit empty state where no activity exists.
12 · Keep control · about 2 minutes
Restore an earlier draft or take your page offline
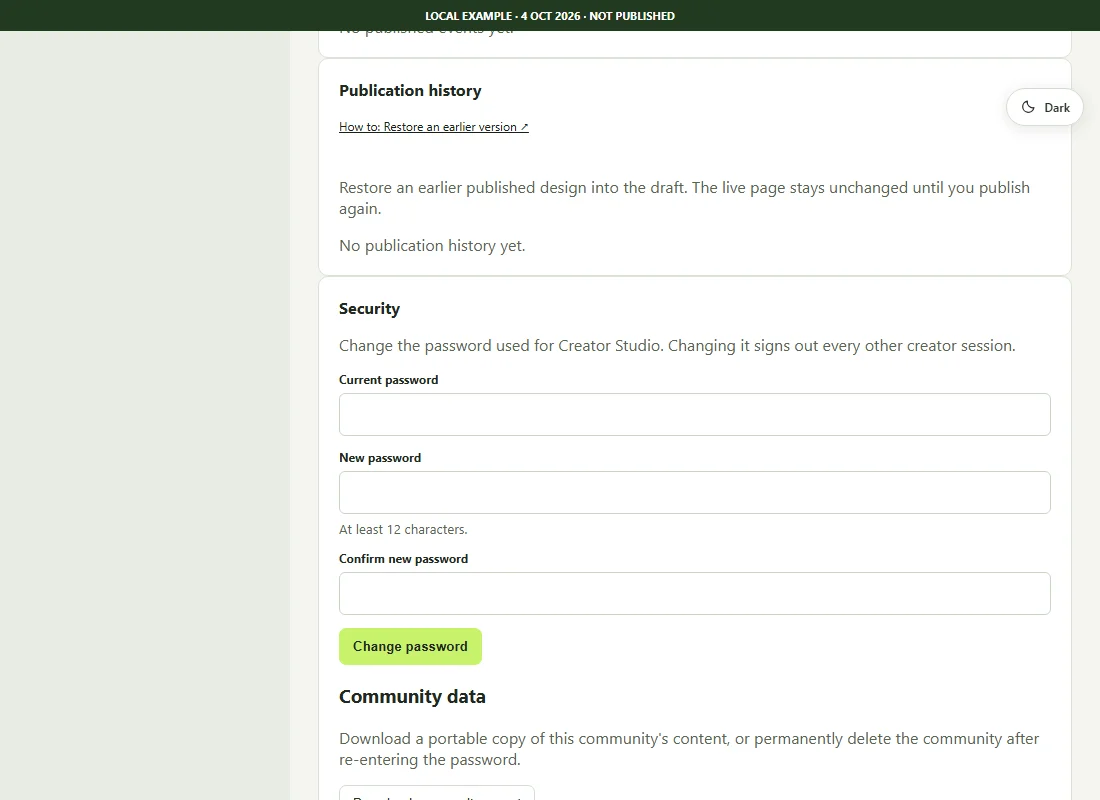
- Open Publication history to see earlier publications. A page that has never been published has no history yet.
- Restore the version you want into your editable draft. Restoring does not replace the public page.
- Review the restored draft, then choose Publish changes if you want it public.
- Choose Unpublish when you want the public page offline while keeping the draft. This differs from permanent community deletion.
- For a portable backup, use Security → Community data → Download community export.
You should see: the restored draft or an unpublication confirmation. Public visibility follows Publish and Unpublish, rather than your learning checkmarks.
When a step does not work
Get unstuck
I cannot sign in or find the confirmation email
Check the displayed email and your spam folder. Creator and member accounts use different sign-in pages. Use creator password recovery if needed. If email delivery is unavailable, follow the form's error message and contact support on X; an X account is required.
The tutorial button took me to sign-in
Sign in to your creator account on the Community host. Your selected tutorial step will open after Studio loads in that tab. If browser storage is blocked, open this guide and select the step again after signing in.
I saved, but the public page is unchanged
Save draft keeps edits private. Preview them, choose Publish changes, wait for success, and then open View Community home and View Link page. Updates and events have their own publish actions.
I cannot see the editor on my phone
Choose Edit above the editor/preview panel. Choose Preview when reviewing the rendered page. A tutorial link to an editor field selects Edit for you.
My changes conflict with another tab
Keep a copy of text you want to preserve. Reload Studio to get the latest saved draft, reapply your changes and save again. Avoid editing the same community in two tabs at once.
A screenshot differs from my screen
These screenshots show example data checked on 4 October 2026. Read the visible labels and publication status on your screen; your content and account state will differ.
More context: creator getting-started path · community creation article · browse published communities.